since 2/28/10

Member
Copyright Protected
Blog Trains

CU license

Tuesday, October 30, 2012
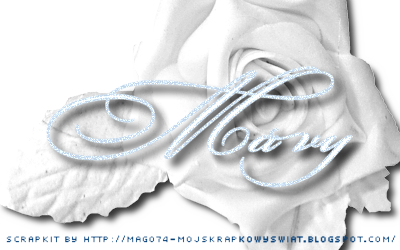
Here is my support for a beautiful human being and her fight with breast cancer. As much as I hate the color pink, my blog will stay pink until she defeats this, and I know she will! You can follow her and her huge fight against this cancer here: http://sunshinesbc.blogspot.com/. We're with you Tracy!
Friday, February 24, 2012

Tutorial written by Mavy Storme
Just a note but if you are new to PSP you might not fully understand this tutorial as sometimes my thoughts do not come out quite the way I mean for them to when I write them down and I can be very hard to follow. I will explain to the best of my ability and hopefully you can follow my thoughts.
Kit: My Color Me Green kit that can be purchased here.
Tube: Barb Jensen’s tube layered 23 foundhere
Mask: WeeScotsLass Mask 307 here
Font: P22 Corinthia, and Pixlette for copyright
Plug ins: Xero soft mood and Lokas Software 3D shadow
Please note I use PSPX4 so your PSP may not have all the features, or have the features in the same place as mine does.
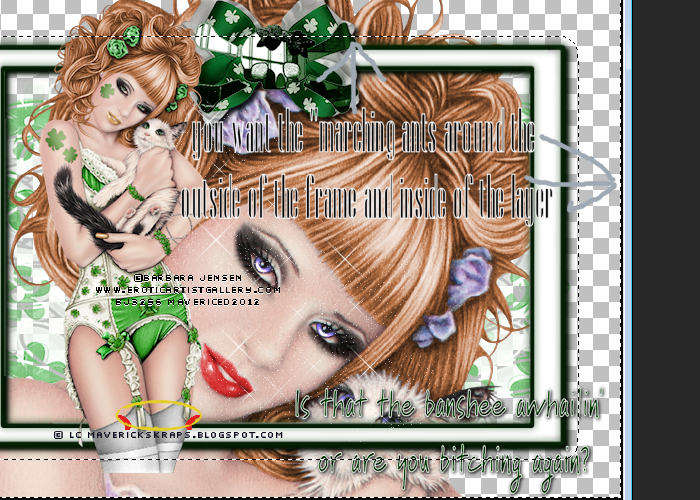
I usually open everything I’m going to use while to create the tag right then, some I actually use, others I tend not to, depends on how the tag turns out. In this case, I opened some I used, and I didn’t open others I used, but the ones that I did use were: Paper 12, Elements: Banshee word art, glitter2, swirl2, frame1, skull1, and bow 3.
Now let’s see if I can explain how I made the tag…
Open a new image in your PSP, 700 width X 500 height. Make sure it is 72.000 DPI because most artists (I recently learned XeracX allows a higher DPI) allow only 72.000 DPI. Copy and paste frame one to your new image. Go to layers, load mask from disk, and select WSL_Mask307. Merge group.
Open swirl2, copy and paste over top of your mask layer.
Open Frame1, copy and paste over the swirl2 layer.
Open bow3 , copy and paste over frame1, resize 75% twice. (The reason for this is that when you resize it 50% you half it, but if you resize it 75%, you are only resizing the next resize by 75% so you aren’t really resizing it 50%. ) Move your bow to the top of the frame and center it on the top line. (If using X4 just go to Objects, Align, and Horizontal Center.)
Open skull1, copy and paste it as a new layer over the bow layer. Resize 75% 3 times. (For the same reason as above) Move over the top of the bow and center.
Open the close up for the tube. Select your preferred layers if using a Jensen like I am, or any other layered tube, copy and paste merged under the frame layer. Or if you want to do it the hard way (like I do) you can select your layers, merge visible, drag and drop the merged copy, and close the original tube without saving but I don’t recommend you try this unless you have a little experience in PSP. And then copy and paste it under the frame layer. Get your Magic Wand tool, and select the outside of your frame.
click to see larger
Go to Selections, Invert, and Contract it by 19.
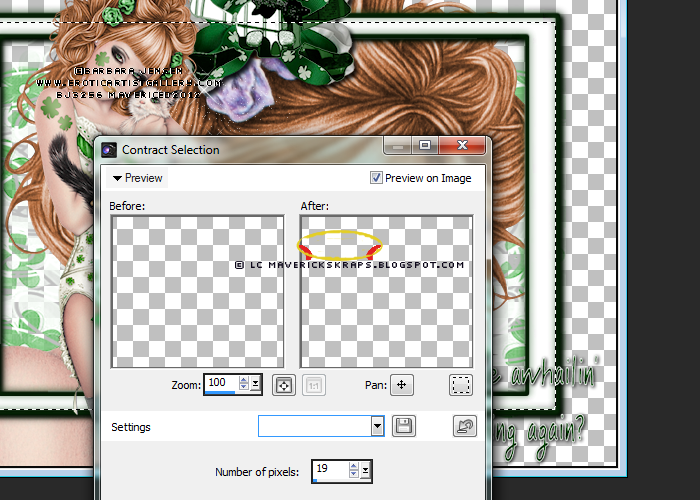
click to see larger
Invert selection again to where it looks like it is in the top screen shot. Select your close up layer and then press the delete key on your keyboard. Right click on the tag with your magic wand to make the dancing dotted lines go away.
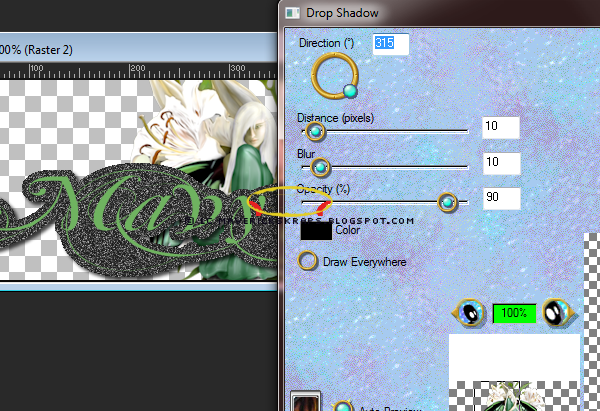
Go to Effects, Xero, Softmood, see settings in screen shot below.

click to see larger
Open your full size tube, select layers, copy and paste merged (or do it the hard way). Move the tube to the left size of the bow after resizing 75%.
Open Glitter2 copy and paste under the full tube.
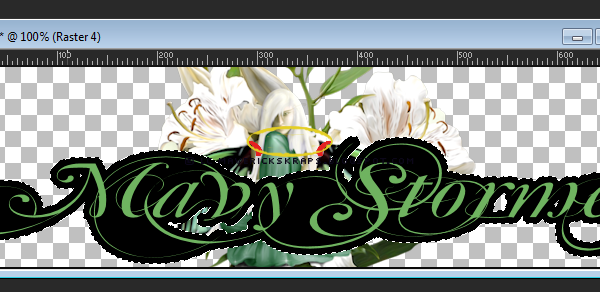
Open the wordart, copy and paste on top layer, resize 75%. Move to the right bottom corner of the frame, see if you can get the center of the word art on either side of the top and bottom of the frame. Go to settings, Lokas 3D. See screen shot below for settings.
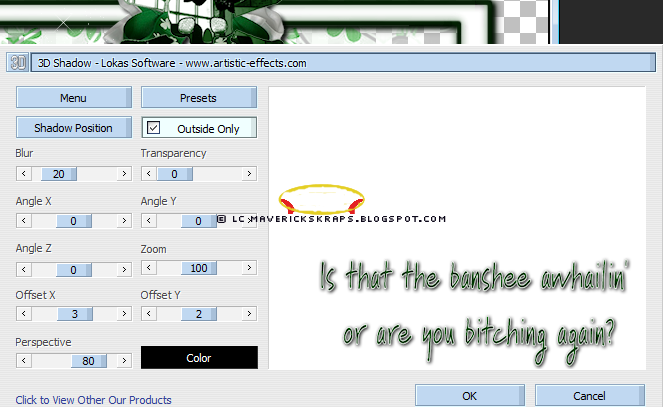
click to see larger
When you’re all done you should have 10 layers; your full tube layer, word art layer, glitter layer, skull layer, bow layer, frame layer, close up layer, swirl layer, and merged mask layer.
You’ll want to open a new raster layer so that it doesn’t conflict with the rest of your layers.
Add your copyright credits, I use pixlettte at size 10, with anti-alias off, and stroke width at 0. I convert to raster and add a glow (eye candy 3.1).
After that you can use your font and give it to your friends!
Hope you enjoyed and made use of this tutorial, thanks for looking!
Wednesday, February 22, 2012
Here's something I haven't done in a long time... a template :O... I think I shocked myself...
It's called Karma Bites, it features one of my FTU word arts that you can find on the Creative Misfit's Blog.
Here is a Preview!

Click for a larger preview
You can download it here
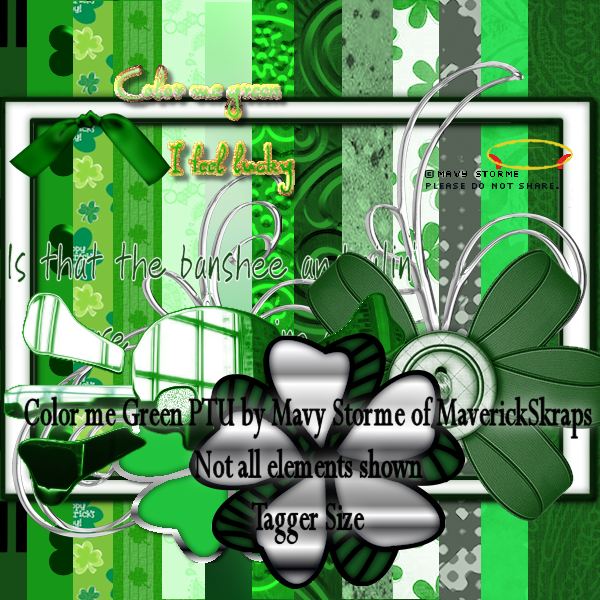
I went out on a limb and tried to make a PTU scrap kit of my own. It's a St. Patrick's Day kit, I call it Color Me Green. It is tagger sized with 36 elements and 15 papers. Maybe one of you can use it lol.
You can purchase it here and while you're there if you are a kit maker or just want some word arts for some reason or another check out my Word Arts!
Click for larger size preview!
Tuesday, February 14, 2012
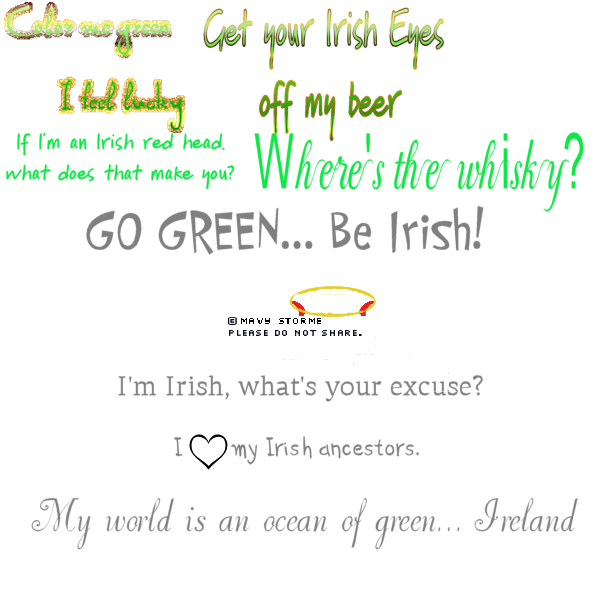
St. Patrick's Day Wordarts for your use, whether it be kit sales, or for personal use! Some are precolored, others are grey scale, all tagger size! The .PSD offers easy access to each of the word arts without a lot of cropping fuss!
click for full size preview
You can find them here!
And a freebie!!!

Monday, February 13, 2012
I don't do this unless its a CT Tag but I'm rather excited about this gorgeous tube from Hunter Cazador! It is a Tagger's Den exclusive that our members worked hard to get for us! The member's of the Den are awesome! And so without further adlibbing... I give you Gothic Storme!

Thursday, February 9, 2012
I am going to be selling some of my word art packs at Digi Scrap Dayz!
I am offering Custom Word Arts too! For more Details look here!
Any of my FTU word arts will remain FTU!
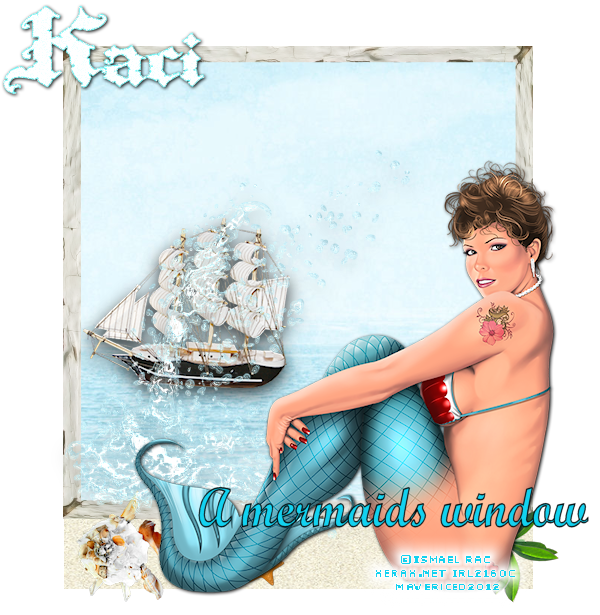
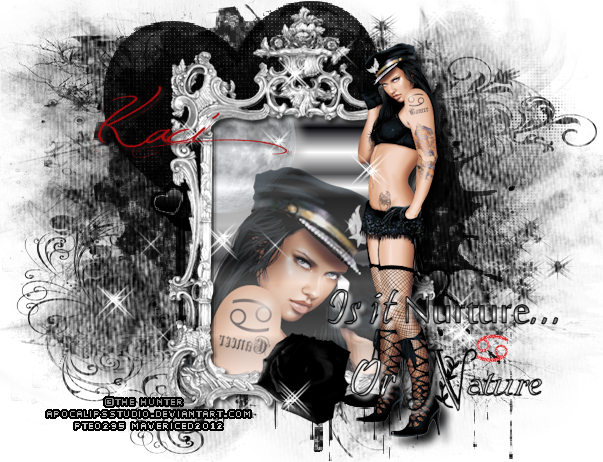
Got to playing with my new Hunter Cazador tube from PTE, it's one of his zodiac tubes. Me being a Cancer, of course I got her ;). Got to reading up about Cancers last night looking for a good word art idea, AND, I learned that Cancers are very good nurturer's and apparently we are supposed to be pretty hot in other areas too if you get my meaning ;). This is what I came up with using Kaci's Twilight Lovr Kit and my new tube.
Tuesday, February 7, 2012
The Misfit Blog Train is heading out again on Feb 10, this time with Valentine, or Anti-Valentine goodies! Can't wait, only a few days left!!!

Thursday, February 2, 2012
Things to do when the internet is down... Make tags!!!! Or make a tag and write a tutorial on how to do it....
SO heres a no scrap tag :).
SO heres a no scrap tag :).

Tutorial written by Mavy Storme
Just a note but if you are new to PSP you might not fully understand this tutorial as sometimes my thoughts do not come out quite the way I mean for them to when I write them down and I can be very hard to follow. I will explain to the best of my ability and hopefully you can follow my thoughts.
Kit: no scraps
Tube: Camilla Drakenborg CA0059 found here
Mask: none
Font: Mutlu, and Pixlette for copyright
Plug ins: Eye candy 3.1 glow and drop shadow, Lokas Software 3D shadow, plug in galaxy noiseee
I usually open everything I’m going to use while to create the tag right then, some I actually use, others I tend not to, depends on how the tag turns out. In this case, I didn’t use any scraps all I have for you is a glitter background for the tag. Right click and save to your computer so that you can use it for your tag.
Now let’s see if I can explain how I made the tag…
I opened my tube and selected the layer I wanted, then I opened a new paper, 700 width by 200 height. Make sure your DPI is set to 72.000, mine does it automatically, but not everyone’s does.
Copy and paste your tube to the new image, resize to 50%. Go to your eye dropper looking tool (color select) and pick two colors from the tube you like best. I chose the green and black.
Go to your text tool and select a text , I used Mutlu, a very fancy script which tends to work well in these cases, but if you prefer a block type text, it will work as well. I used size 36, anti-alias sharp, and stroke at 0.0.
Write the person’s name on the tag, I use my own in the screen shots and Rapsody, owner of Up Your Art, where you can find the tube I used, in the tag you see above. Stretch the text to where it covers the width of the tag, and approximately half it’s height. Convert it to a Raster layer. Go to layers, create new raster layer and move it under your text layer. Select your text layer and go to your magic wand tool. Select all, go to selections and invert. Then go to modify and expand by 6.

Select your blank layer and flood fill the inside of your selected area with your second color.
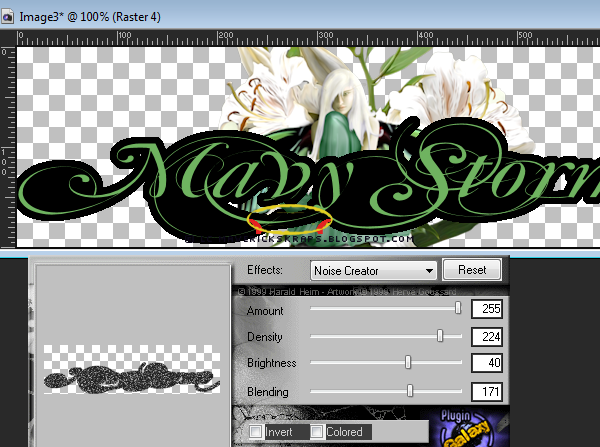
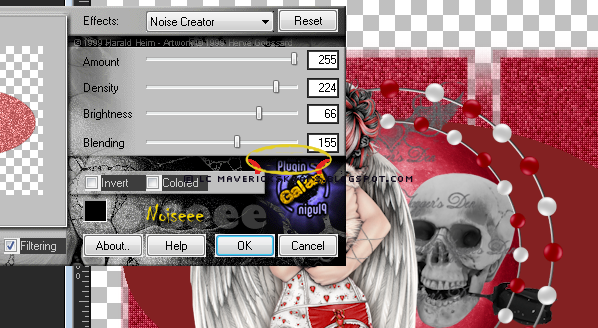
Deselect, go to effects, plug in galaxy, noiseee, and create a glitter effect.
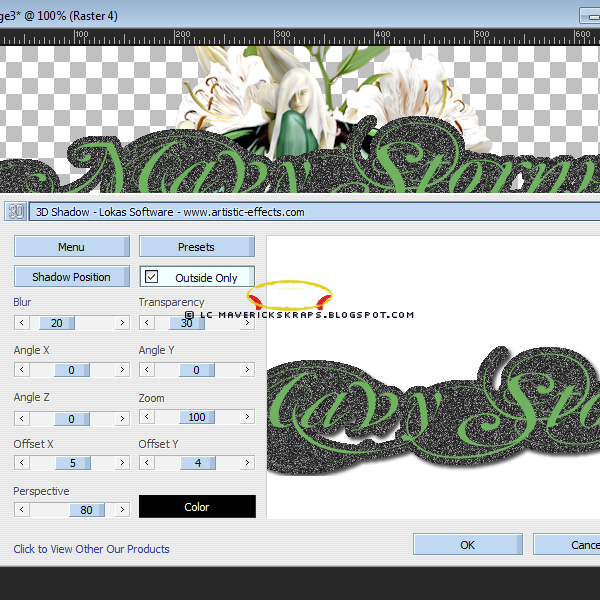
Select your text layer and merge down. Go to effects, lokas software, 3D shadow, see settings on image.
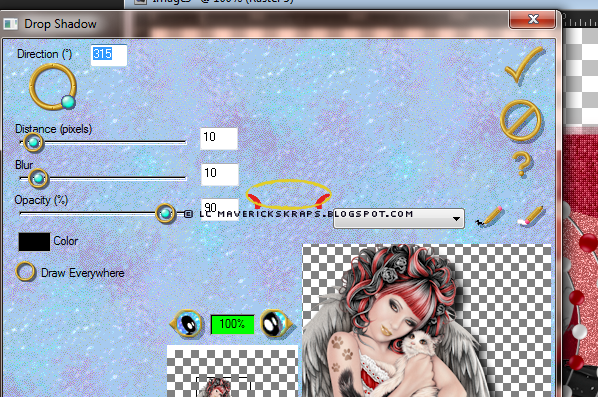
Select your tube layer, go to effects, eye candy 3.1, and then drop shadow. See settings on image.
You should now have 3 layers, your name layer, tube layer, and a blank raster layer. I have included a glitter layer in the tutorial, if you haven’t saved it, please do, and then open it in your psp, and copy and paste as a new layer. Move it under your tube layer.
Go to layers, and create a new raster layer, move it on top of all the other layers, you’ll want it for your copyrights so that it doesn’t create a conflict.
Add your copyright credits, I use pixlettte at size 10, with anti-alias off, and stroke width at 0. I convert to raster and add a glow (eye candy 3.1).
Hope you enjoyed and made use of this tutorial, thanks for looking!


Saturday, January 28, 2012
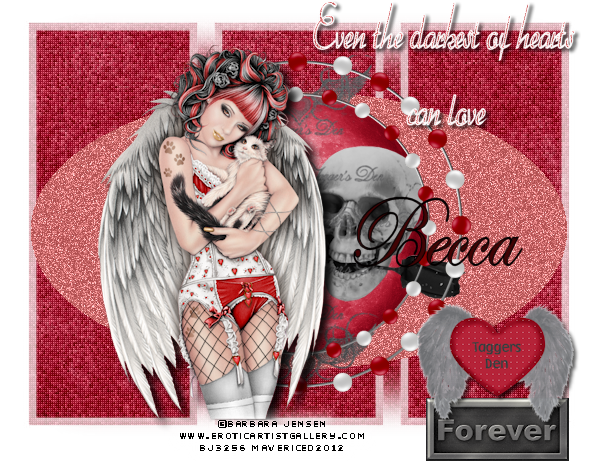
My friend Becca (found here) decided to play tube fairy yesterday after seeing me drool over some gorgeous Jensen tubes. So I made her a pretty tag and turned it into my second tutorial.
Tutorial written by Mavy Storme
Just a note but if you are new to PSP you might not fully understand this tutorial as sometimes my thoughts do not come out quite the way I mean for them to when I write them down and I can be very hard to follow. I will explain to the best of my ability and hopefully you can follow my thoughts.
Kit: Exclusive kit from the Tagger’s Den by Alika’s Scraps found here.
Tube: Barb Jensen’s tube layered 23 found here
Mask: my own mask , see image below, and WeeScotsLass mask 148 found here
Font: Edwardian Script, and Pixlette for copyright
Plug ins: Eye candy 3.1 glow and drop shadow, Lokas Software 3D shadow, Plug in Galaxy Noiseee, Xero Friltillary
PSP Version: I use X4, but if you have a good knowledge of psp you should be able to use any version
I usually open everything I’m going to use while to create the tag right then, some I actually use, others I tend not to, depends on how the tag turns out. In this case, I didn’t use everything I opened but I’ll give a list of just what I opened: as paper 5 and 11, as09, as73, as24, as73, as36, and as60, and my word art that you’ll find just below.

(To see a larger size and save click on the image and then right click)
Now let’s see if I can explain how I made the tag…
To start open a new paper 600X600 with a transparent background and make sure your DPI is 72.000. It can be cropped/resized before you put your copyrights on later if you don’t like the size.
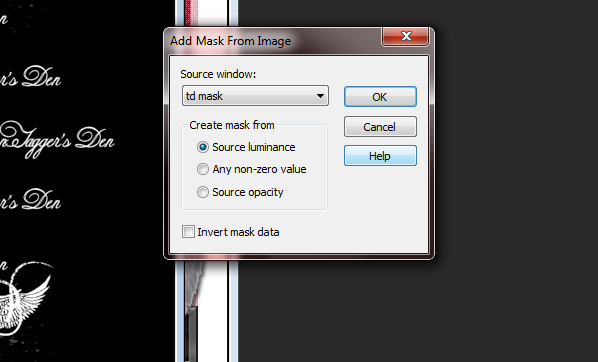
Get as paper 05 and copy and paste on your new image. Make sure the TD mask is in your masks folder and you can go to selections, load mask from disk, otherwise you’ll have to open it on your workspace and go to layers, new mask layer, and make sure you select td mask. See image for reference.
Next merge group and resize to 50%.
Next merge group and resize to 50%.
Copy and paste your second paper (as paper 11) as a new layer to the new image (your tag). Go to selections, load mask from disk and use WSL_Mask 148. Merge group and move the image below your TD mask layer. Go to effects, Zero, Fritillary. See settings below.

Go to your Ellipse tool (the oval on the preset images tool) and make sure your colors are white and white. On your presets make sure your image is an oval. Make an oval about the width of the WLS mask, but not quite as tall. Convert it to a raster layer, flood fill it a dark red, go to effects, Plug in Galaxy, Noisee. See the settings on the image below.
Get element AS09 copy and paste under the TD mask layer, resize to 50%
Get element AS73 copy and paste as top layer, resize to 75%.
Get element AS24 copy and paste under the beaded circle layer.
Copy and paste your tube as the top layer, resize to 65%. Go to your move tool, move the tube slightly to the left so that you can see the skull and rose just beside it. Then go to effects, Eye candy 3.1, and use a drop shadow on it. See settings in image.
If you want to make it look a little neater, you can erase the slight shadow just under the edge of the bottom of the legs.
Get element AS60 copy and paste, and resize to 50%. Move to the bottom right of your tag. Effects, Lokas 3D shadow. See settings in image.

Get AS36, copy and paste it, then resize to 75%. Move it down under the layer with the TD heart, and then move it over to where it is just slightly under the wings. Try to get it as centered as possible.
Copy and paste the word art to your tag, go to your move tool and move it to the top right corner of your mask as the top layer. You’ll want to let it be slightly above the mask just for looks.
Add your copyright credits, I use pixlettte at size 10, with anti-alias off, and stroke width at 0. I convert to raster and add a glow (eye candy 3.1).
After that you can use your font and give it to your friends!
Hope you enjoyed and made use of this tutorial, thanks for looking!
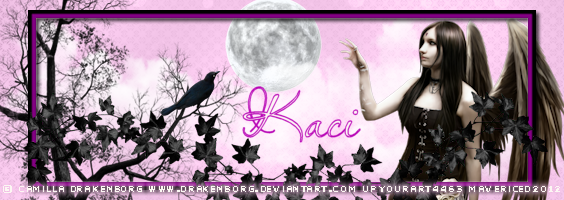
With Kaci's new kit Rockabilly found here on her blog I made another tag
My fiance got me this Barb Jensen pack a while back and I hadn't used this particular tube much, never seemed to have a kit that fit her, I do now, even though Kaci made it to go with a Myka Jelina tube.

Friday, January 27, 2012
I'm pleased to say that Kaci of Scrappin' Krazy Designs has been kind enough to let me CT for her with tags! And so using Kaci and Viki's Collab kit Raven I created some tags!
Here is a link to her blog where you can find her stores where Raven is being sold.
The first is a Tony Mauro tag:

The second is a Camilla Drakenborg forum set:

Subscribe to:
Posts (Atom)
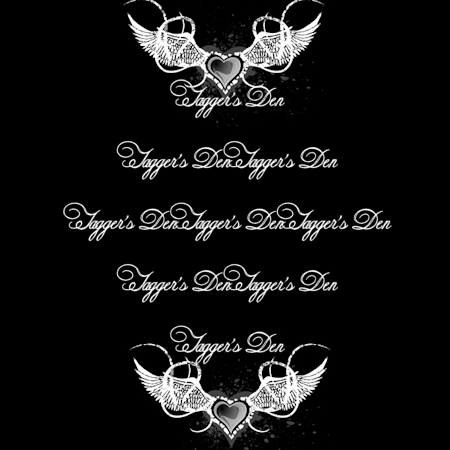
Tagger's Den
The Tagger's Den forum is dedicated to encouraging the free exchange of ideas and knowledge and to expanding the creativity of all it's members, taggers, designers and artists. We are committed to a deep and abiding belief that art should not be censored, that artists should not starve, and that every member should have equal access to all of the ...special things they need to fuel their individual creativity. We provide an endless stream of challenges and opportunities to win and earn tubes, scrapkits and more, plus there's always someone willing to offer a helping hand, be it a tagging problem or a human problem. We offer our hand in friendship to you and welcome you to the Tagger's Den. You can follow us on our blog too!
TYVM to Lesia for making this gorgeous blinkie for the Den!
TYVM to Lesia for making this gorgeous blinkie for the Den!
blinkies

here is my blinkie!
CT

I sell at