Blog Archive
TOU/Notes
FTU TOU: You can use my stuff for FTU kits, temps, you may add it into kits, just make sure there is a link to me in them. *Please do not rip a part my scrapkits for this.* You may use them in your tutorials, just please link back to me. Please don't take credit for my work. You don't have to give credit to me on your work. Thank you for taking the time to download my work, please say thanks via comment or chat box.
Any tags I make for CT work are products of my imagination, if it resembles anyone else's tags, I sincerely apologize as it was not intentional.
Any tutorials that I write are created by me, and resemblance to anyone else's is purely unintentional.
If you want me to see your work and post it on the blog then please send it to mavystorme@rocketmail.com.
PTU TOU: Do not share! Link back to my blog, or to the store where I sell if you use in anything. You can use my stuff for PTU kits, but do not alter my word arts and then resell, or give them away. If the word art is grey scale you may alter it to suit your needs of course. Most of my word arts are in .PSD format, these you may move around to suit your needs, if they are not in .PSD but a .PNG format please don't cut them a part or alter them.
Sites of interest
forums of interest
Labels
- always list (1)
- AOG (1)
- barb jensen (2)
- BCA (1)
- blog train (3)
- broken (1)
- camilla (1)
- collab temps (1)
- contest (1)
- CT (10)
- easter (2)
- exclusive (1)
- facebook (1)
- feb (1)
- forum (2)
- forums (5)
- freebie (6)
- friends blog (3)
- friends blogs (2)
- ftu (12)
- game (1)
- Garet Blair (1)
- Garv (1)
- hunter (1)
- irish (1)
- Kaci (6)
- karma (1)
- kit (2)
- kittens (2)
- layout (3)
- mask (1)
- memorial day (1)
- misfit blog train (3)
- misfits (1)
- Nautical Retreat (1)
- news (1)
- no scraps (1)
- omneya (1)
- pretty tags (1)
- psp (1)
- pte (1)
- PTU (2)
- PTU KIT (10)
- PU (1)
- Raven (1)
- rockabilly (1)
- scrapkit (4)
- scrappin krazy designs (7)
- st patricks (4)
- Store (4)
- Tag showoff (1)
- Tagger Size (1)
- taggers den (5)
- template (4)
- thanks (1)
- Tracy (1)
- tutorial (4)
- Twilight Lovr kit (2)
- uya (1)
- valentine (1)
- word art (22)
- worlds of creation (1)
let me know you d/led
Friday, February 24, 2012
Tutorial written by Mavy Storme
Just a note but if you are new to PSP you might not fully understand this tutorial as sometimes my thoughts do not come out quite the way I mean for them to when I write them down and I can be very hard to follow. I will explain to the best of my ability and hopefully you can follow my thoughts.
Kit: My Color Me Green kit that can be purchased here.
Tube: Barb Jensen’s tube layered 23 foundhere
Mask: WeeScotsLass Mask 307 here
Font: P22 Corinthia, and Pixlette for copyright
Plug ins: Xero soft mood and Lokas Software 3D shadow
Please note I use PSPX4 so your PSP may not have all the features, or have the features in the same place as mine does.
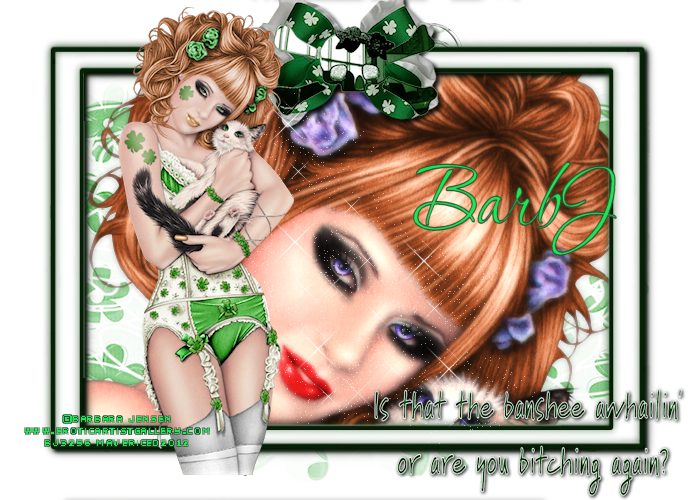
I usually open everything I’m going to use while to create the tag right then, some I actually use, others I tend not to, depends on how the tag turns out. In this case, I opened some I used, and I didn’t open others I used, but the ones that I did use were: Paper 12, Elements: Banshee word art, glitter2, swirl2, frame1, skull1, and bow 3.
Now let’s see if I can explain how I made the tag…
Open a new image in your PSP, 700 width X 500 height. Make sure it is 72.000 DPI because most artists (I recently learned XeracX allows a higher DPI) allow only 72.000 DPI. Copy and paste frame one to your new image. Go to layers, load mask from disk, and select WSL_Mask307. Merge group.
Open swirl2, copy and paste over top of your mask layer.
Open Frame1, copy and paste over the swirl2 layer.
Open bow3 , copy and paste over frame1, resize 75% twice. (The reason for this is that when you resize it 50% you half it, but if you resize it 75%, you are only resizing the next resize by 75% so you aren’t really resizing it 50%. ) Move your bow to the top of the frame and center it on the top line. (If using X4 just go to Objects, Align, and Horizontal Center.)
Open skull1, copy and paste it as a new layer over the bow layer. Resize 75% 3 times. (For the same reason as above) Move over the top of the bow and center.
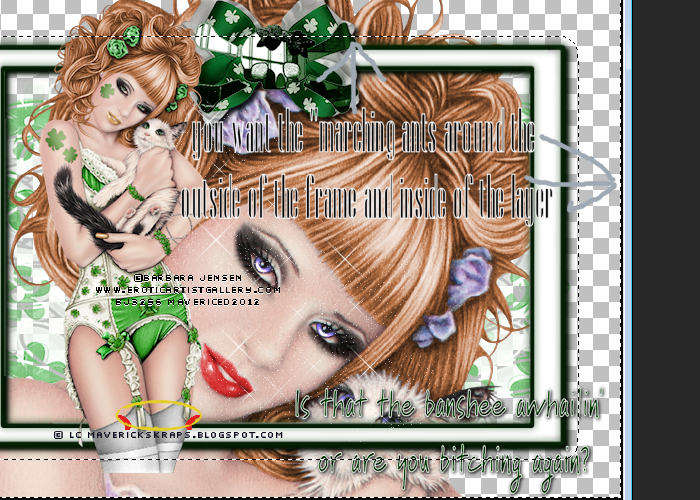
Open the close up for the tube. Select your preferred layers if using a Jensen like I am, or any other layered tube, copy and paste merged under the frame layer. Or if you want to do it the hard way (like I do) you can select your layers, merge visible, drag and drop the merged copy, and close the original tube without saving but I don’t recommend you try this unless you have a little experience in PSP. And then copy and paste it under the frame layer. Get your Magic Wand tool, and select the outside of your frame.
click to see larger
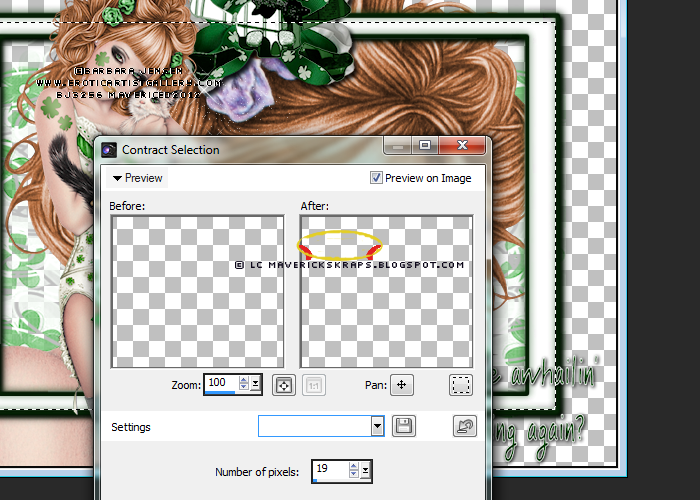
Go to Selections, Invert, and Contract it by 19.
click to see larger
Invert selection again to where it looks like it is in the top screen shot. Select your close up layer and then press the delete key on your keyboard. Right click on the tag with your magic wand to make the dancing dotted lines go away.
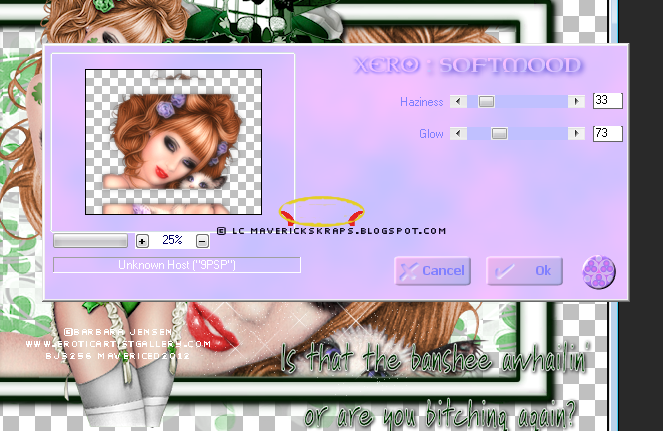
Go to Effects, Xero, Softmood, see settings in screen shot below.
click to see larger
Open your full size tube, select layers, copy and paste merged (or do it the hard way). Move the tube to the left size of the bow after resizing 75%.
Open Glitter2 copy and paste under the full tube.
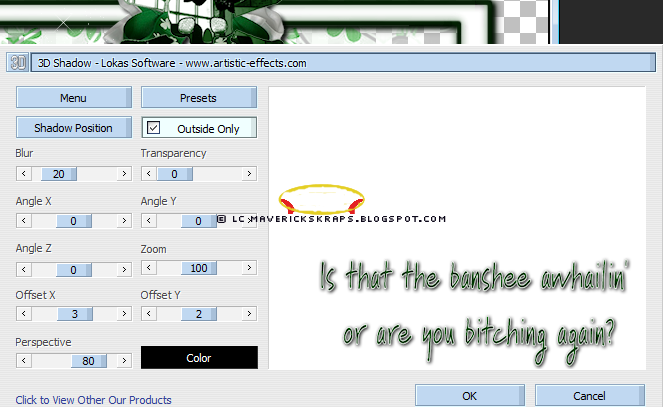
Open the wordart, copy and paste on top layer, resize 75%. Move to the right bottom corner of the frame, see if you can get the center of the word art on either side of the top and bottom of the frame. Go to settings, Lokas 3D. See screen shot below for settings.
click to see larger
When you’re all done you should have 10 layers; your full tube layer, word art layer, glitter layer, skull layer, bow layer, frame layer, close up layer, swirl layer, and merged mask layer.
You’ll want to open a new raster layer so that it doesn’t conflict with the rest of your layers.
Add your copyright credits, I use pixlettte at size 10, with anti-alias off, and stroke width at 0. I convert to raster and add a glow (eye candy 3.1).
After that you can use your font and give it to your friends!
Hope you enjoyed and made use of this tutorial, thanks for looking!
Subscribe to:
Post Comments (Atom)
Interesting Blogs
Tagger's Den
The Tagger's Den forum is dedicated to encouraging the free exchange of ideas and knowledge and to expanding the creativity of all it's members, taggers, designers and artists. We are committed to a deep and abiding belief that art should not be censored, that artists should not starve, and that every member should have equal access to all of the ...special things they need to fuel their individual creativity. We provide an endless stream of challenges and opportunities to win and earn tubes, scrapkits and more, plus there's always someone willing to offer a helping hand, be it a tagging problem or a human problem. We offer our hand in friendship to you and welcome you to the Tagger's Den. You can follow us on our blog too!
TYVM to Lesia for making this gorgeous blinkie for the Den!
TYVM to Lesia for making this gorgeous blinkie for the Den!

blinkies

here is my blinkie!




0 comments:
Post a Comment